Techniques
Index
HDR
Infra Red
Digital Workflow
Colour Management
Understanding Histograms for Raw Files
HDR
I have been interested in High Dynamic Range images (HDR) for several years now. I was always disappointed in the dynamic range of slide film so more often used negative film. I used Raw files from day one with my first DSLR as it was clear that the dynamic range was good. I would roughly classify capture dynamic range:
| Media | Dynamic Range |
|---|---|
| Slide Film | 5-6 stops |
| Negative Film | 9-10 stops |
| DSLR JPEG | 6-7 stops |
| DSLR Raw | 10-11 stops |
I am aware that these figures are guides only. Negative film tends to compress near the limits which is more attractive than clipping. It is also possible to improve on the figures for negatives by different devlopment though this may introduce more grain. However, the figures for DSLR Raw are conservative and many cameras now exceed this; my own camera is quoted as 11.9 stops dynamic range.
It is useful to compare the typical dynamic range of different scenes:
| Scene | Dynamic Range |
|---|---|
| Overcast but no sky in scene | 3 stops |
| Sunny with side lighting | 7 stops |
| Snow capped mountains in sunny landscape | 12 stops |
| Night Scene with Street Lamps | 14 stops |
| Interior with sun streaming through Window | 14 stops |
| Full Sunny backlit scene | 18 stops |
It is apparent that slide film would struggle even with sun and shade but, for the the scenes above 10 stops, even a Raw file may not sufficient to fully capture the dynamic range. Traditionally we have tended to expose to just avoid burning out highlights and just accept that some of the shadow detail will be lost. In the more extreme scenes this meant that you could not really capture shots into the light without having sihouettes and church interiors did not show the splendid detail and colour that is largely visible by eye. The fact is that the human eye with pupil dilation can cope with scenes of up to about 18 stops so cameras are very disappointing for high dynamic range. Comparing human vision with a camera is very difficult. The human eye in real time may only cope with about 9 stops but it is our perception of vision which matters. We perceive what our Brain tell us is there and this is not just based on the captured light as it would be for a camera. Our perceived vision is dependent on the scene scanned using different pupil dilation, affected by memory or even pre-conceived ideas of the scene. This complex processing by the brain can result in some similar effects to HDR processing of multiple exposures. However, because the two processes are not the same, it is not possible to say that HDR is entirely natural or unnatural but I would suggest that it provides a more accurate rendering of our perception in many high dynamic range situations.
Definition - HDR is a set of techniques which allows a photographer to display larger dynamic range scenes which would not be possible using standard image processing. The intention is to represent the range of light from direct sunlight to shadows. This process will normally involve combining multiple camera exposures to capture and display the large dynamic range.
HDR Workflow
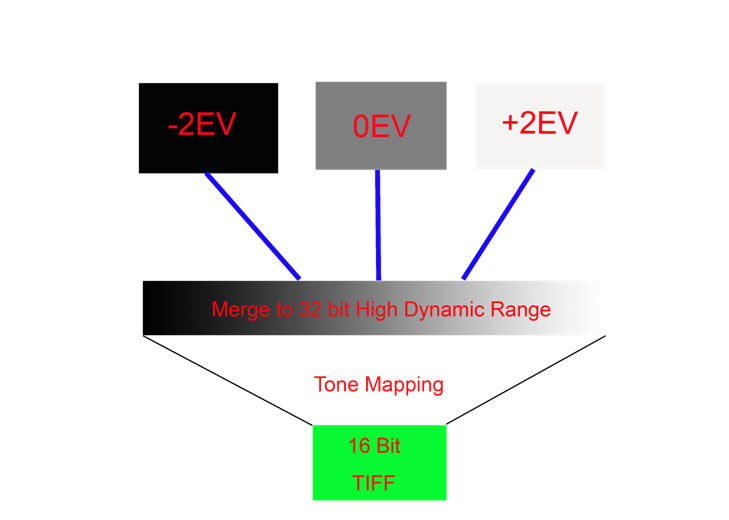
The diagram below shows how 3 different exposure values (-2EV, 0EV & +2EV) are merged to form a 32 bit HDR image. This image must be tone mapped to 16 bit (or even 8 bit) for later processing, printing or displaying.
Tone Mapping
Global tone mapping compresses the overall tonal range captured to fit into the available 16 (or 8) bit image. However, this can leave such images looking dull and flat because the critical mid tones are compresses and low contrast. The global tone mapping does enable capture of the lightest and darkest areas. Local tone mapping operators compare areas locally to improve the contrast of mid tone areas within the image. This effect can be used to achieve a more natural output but can be applied more strongly to give a more dramatic Surreal effect. Good HDR software such as Nik HDR Pro, Photomatix, Oloneo, FDR Tools Lightroom cc and Photoshop cc uses a combination of local and global tone mapping.
Capturing Multiple Exposures for HDR
Typically take at least 3 Raw exposures at two stop interval though 5 or 7 in more extreme scenes. Alternatively take at least 5 JPEG exposures at one stop intervals though 7 or 9 in more extreme scenes.
- Do not vary aperture during HDR exposures - use manual or AV mode
- Use a tripod if at all possible
- Use auto bracketing which will typically take 3 exposures (or more for some cameras)
- Avoid moving objects in the scene (clouds, water, people, animals can all be a problem)
Colour Reality
With most HDR software you can choose whether the have reasonably natural colours right through to sureal effects. For most of my landscapes I prefer more natural colours. For good natural colour, I have found ticking the Natural HDR Mode in Oloneo to be effective. However, for me Lightroom cc is excellent at producing natural colour and tonal effects as well as easy to use.
Ghosting
Moving objects in the scene can cause ghosting or odd artifacts to appear. HDR software may have built-in de-ghosting but I have found that some work better than others. I find that auto de-ghosting is not always effective for Photomatix but the semi-manual method in Photomatix works very well. Auto de-ghosting in Oloneo does seem to work well as it does for Lightroom cc. You can sometimes cope with this problem by cloning an object that moved back into the final tone mapped image from one of the original single exposures.
HDR Software
I currently have Oloneo, Nik HDR Pro, Photomatix Pro 4, Photoshop cc and Lightroom cc. Lightroom cc is unusual in that after combining the multiple exposure, the output file is still a dng Raw file thus allowing the complete range od Raw editing. Editing the 32 bit dng files in LR gives access to the huge dynamic range in a 32 bit file so the exposure slider instead of being normally +/- 5 (Stops), it becomes +/- 10 stops. The advantage is that you edit a file much as you would a single Raw files but can pull in extreme shadow and highlight detail. The net result is normally fairly natural so I would recommend this process though it requires manual editing and thus takes more time. Deghosting also works well on Lightroom cc. The rest of the software is fairly automated and the easiest to use is Oloneo which has an auto mode which allows one to adjust the entire HDR effect with one slider; this is very effective. Unless I want a surreal effect, I always tick the Natural HDR Mode. I have recent purchased Nik HDR Pro and while not as quick to use as Oloneo, it has the advantage of control points which allow local control of the process. Using Nik HDR Pro can take a little longer but it can produce excellent results and seems to cope with some hand held exposure sets better than Oloneo. Photomatix has exhibited a problem (certainly since version 4). If auto-deghosting is on then it often seems to produce a fuzzy/misty effect on parts of the final image. If switched off, I still find that many raw sets processed through Photomatix produce Fuzzy or blurry results after tone mapping (there are many comments on the internet on this).
My preference at this time is to use Lightroom as the results are excellent. The results from Lightroom are very good but requires a little more time but this hands on approach gives more control and may suit many photographers. I still sometimes use Oloneo as this is very fast and only in more challenging cases would I then turn to Nik HDR Pro which has the advantage of control points.
HDR and Panoramic
You can combine HDR with a panoramic set by taking multiple exposures of each of the scenes. I normally process the HDR sets first and then stitch the panorama. THis is where Lightroom cc really scores as you can process in HDR and panoramic and still retain a dng Raw file.
HDR Examples
Please click here for Examples of my HDR images.
Top
Infra Red
My History
In the past, I have occasionally used Infra red film and, although it was difficult to store and results often appeared unpredictable, some startling images could be produced. With my first DSLR (EOS 20D), I tried some IR simulation in Photoshop which sometimes produced an interesting effect but was not really like true IR. I then tried an R72 IR filter on my 20D but the exposure times were typically 30 seconds. This means using a tripod but, while this is fine for landscapes, the photograph is spoilt by any moving objects. Unfortunately, trees, shrubs and clouds can move a lot in 30 seconds so I gave up this method fairly quickly. I have now had my EOS 20D modified for Infra Red.
Modifying a DSLR for Infra Red
The process is that the IR block filter located above the sensor is removed (it is this that reduces the cameras sensitivity to IR) and it is replaced by an IR pass filter. You can typically choose a 720nm or 840nm filter. The first does just allow some visible light to be captured as well as near IR whereas the 840 nm wil only allow near IR which tends to retrict the output to B&W only. With the 720nm filter, you can produce colour IR by using channel inversion techniques as well as the traditional B&W images. I chose the 720nm because I wanted the flexibility. As part of the modification, the sensor is moved back slightly so that IR light is then correctly focussed on the sensor. An alternative is to make a focussing adjustment on your lens but IR focussing marks are now rare on modern lenses. I also selected my EOS 20D for modification as it was then redundant but I knew that it was in good condition and was on the list of those models than can be converted. I seriously considered modifying the camera myself as I felt confident with a science background and detailed instructions are available on the internet. However, I also worked as a professional engineer and this experience suggested that I might be quite good after about the 5th go and the cost of parts was around 2/3 the price anyway. I wanted mine right first time so decided to use a specialist company.
Exposure and Contrast
My experiences so far is that exposure is more predictable than IR film which was very hit and miss. You also have the advantage of seeing an image on the screen and the histogram. I have found that IR generally produces a more attractive landscape photograph in bright sunlight though that is not to suggest that IR cannot be used in other circumstances. Despite such scenes being high contrast in visible light, the histogram rarely exceeds the range on the screen so by setting the right exposure, you should not clip the lightest or darkest areas. For my converted EOS20D, I find that I can use the metering from my camera providing I set the exposure compensation at +1.5 stops (I leave this set all the time). I normally use semi-spot metering on the main subject. The only case I have used multiple exposures is inside a cathedral where the dynamic range was very high.
Lenses and Flare
Manufacturers and most lens reviews appear to have taken little notice of IR lens performance until recently. Just because a lens performs well in visible, it may not necessarily do so when used for IR. The main problems are hot spots and flare which can be serious. Useful links for information on IR lens performance are:
DP Answers http://dpanswers.com/content/irphoto_lenses.php
Lens Play http://www.lensplay.com/lenses/lens_infra_red_IR.html
My own experiences are:
a. Canon 10-22mm EF-S - recommended and I find very good performance and sharp images.
b. Sigma 12-24mm not recommended on one site but recommended on another, I find very susceptible to IR flare and edges always very soft (almost unusable for IR).
c. Canon 24-105mm seems to be one of the most recommended for IR and my experience is excellent performance with sharp images.
d. Canon 70-200mm f2.8 IR L - not recommended on one site as having a hot spot but I have not used mine for IR yet
Custom White Balance
It is important to set a custom White balance for IR and this is simple to do. Ensure that you have bright sunlight and find an area of grass. The exact details may vary from model to model so follow the details in the camera handbook.
- Set the Camera to Custom WB
- Take a shot of the grass filling the viewfinder but manually defocusing
- Make sure that the exposure is about normal by adjusting if necessary
- Save the shot as a Custom Setting
- Ensure that you set this custom setting as the default
Processing in Adobe Raw – White balance compensation
When you import your IR Raw image into Adobe Raw, you will almost certainly find that the “as Shot” WB is 2000 K. This is not the correct figure as your custom WB will almost certainly be lower than this but 2000 k is the lowest value Adobe Raw shows. You can settle for this but your images will still not be neutral. I downloaded the Adobe Labs DNG Profile Editor. I use this to create a bespoke conversion profile for my visible light camera but it has a section on IR Modified Cameras:
http://labs.adobe.com/wiki/index.php/DNG_Profiles:Editor#tutorial_ir
If you follow the guidance in the tutorial you can create a profile which offsets the WB value so that it comes into range . I have done this and now my IR Raw images are all neutral. The profile will be picked up by LR, PS or Elements. In LR, I have set this profile as the default for my converted camera,
Other Adobe Raw Tips
I often find that IR images benefit from darkening the sky a little and you can use the gradient filter in Adobe Raw. However, one of the difficulties is that you are still viewing something that is very different to the final image. Much of the post processing of IR is done in PS and you can find that part way through you wish you had different Raw editor settings. This is one case where I find it advantageous to open the converted file as a Smart Object. You may then apply an action or other changes but can reopen the smart object and change Raw settings. There are limits to this but it can save time. Because I find that the contrast is much lower for IR, I usually find it necessary to increase the contrast for such images.
Channel Swapping
For colour IR, it is popular to swap the Red and Blue Channels. The effect is to produce a blue sky with light pink foliage which is now often seen. It is best to create an Action to do this as you will need to use it many times.
The way to channel swap is to create a Channel Mixer Adjustment Layer . Select the Red Output Channel and then set the Red channel to 0% and Blue Channel 100%. Then select the Blue Output Channel and set the Blue Channel to 0% and Red Chanel to 100%.
I have produced some variations of these which includes; after the channel swap, copy the layer and blur but set the Blend to Soft Light.
Lab Mode
If you would really like to create more colourful IR photographs one technique is to first convert to Lab Mode. Then select one of the colour channels (a or b) and apply levels. You will find the histogram to be very narrow so move the White and Black sliders in to intensify the colours. You can also bias the colour by moving the centre point. Repeat this for the other colour channel. You now have 6 alternatives by inverting or not the colour channels or luminance channel.
The Infra Red World
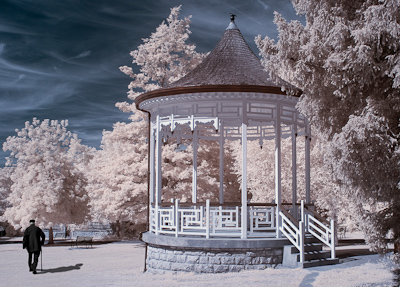
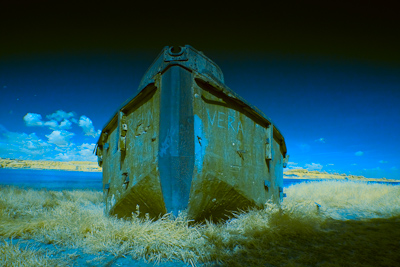
I am still exploring the infra red world but I am mainly attracted to landscapes and seascapes for IR both colour and B&W. Shots which include a building as well as foliage also work well. I am still learning about colour IR processing techniques but Clive Haynes publishes some excellent advice on his website.
IR Examples
Please click here for Examples of my IR images.
Top
Digital Workflow
My History
Over the many years I have been processing digital images, my workflow has changed and adapted to the different input sources, formats and processing software. I started by scanning film in the 1990's and processing using Photodesk on an Acorn RiscPC. I now use a standard PC with mainly Adobe software and only capture in Raw. While I was content to manage my collection using the Bridge for many years, I eventually purchased Lightroom to provide more comprehensive digital asset management.
My Current Workflow
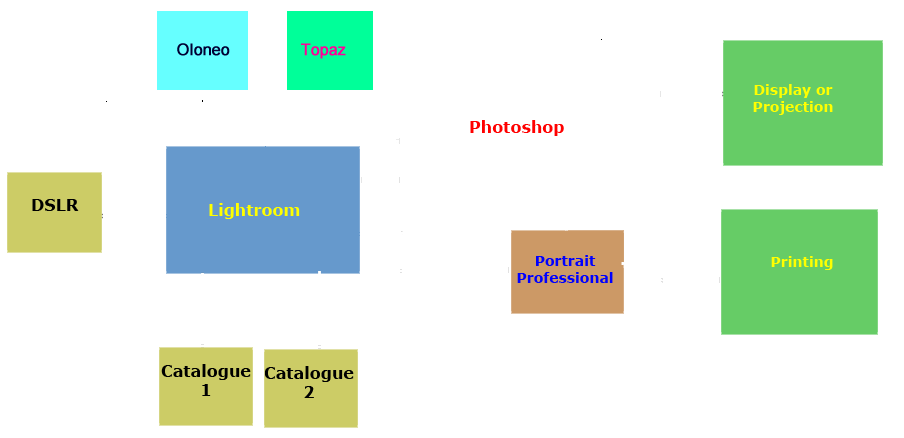
My image files are transferred from my Camera or via the card reader to Lightroom; they are actually stored in my monthly folder and imported to the Lightroom catalogue. I currently use two LR catalogues. The main catalogue comprises all of my final editied images and Raw files up to about 2 years old. All earlier Raw files are in my second LR catalogue. Each conatins about 10,000 files. I initially process in LR:-
- Mark for deletion images not needed
- Colour code remainder
- Add keywords
- Stack HDR set or Panorama sets
- Rate images
I then edit any 5* images (if any) followed by 4* images. I only process any 3* if required for non competition purposes. I use almost all of the editing tools and adjustments in LR including, exposure, recovery, fill light, Blacks, clarity, curves, lens correction, cropping/straightening/perspective, graduated filter, spot removal, adjustment brush, colour adjustments, sharpening, noise reduction (if needed) and saturation. I also often convert to B&W and use split toning where appropriate in LR. In fact about 70% of editing in now in LR with 20% in Oloneo or Topaz and only 10% in Photoshop.
I mainly use Photoshop when I need layers, cloning and for final sharpening. For my HDR shots, I can export to Oloneo directly from LR. For much of the routine formal portrait work, I now use Portrait Professional. I now almost always print directly from Lightroom though still occassionally print directly from Photoshop. This really places Lightroom at the centre of my workflow and that fact that external software such as Oloneo, Photomatix and Topaz filters can be used directly from Lightroom helps.
Alternative Workflows
The above workflow might suit very keen amateurs or professionals but is more than most photographers need. I suggest the following alternatives are compared with your needs:
- Elements only (currently Elements 10) - Elements has a good catalogue system and good basic editing facilities (including Raw processing) and useful output facilities for printing, web and slideshows. This is excellent value.
- Lightroom used with Elements - This has the advantage of a more sophisticated catalogue (useful if you have a tens of thousands of images) and offers the full Raw editing facilities. This is a good combination particularly for those who process lots of Raw Images.
- Photoshop (currently CS5) - This comes with the Bridge and this package does provide digital asset management to code, rate, keyword and stack images but it is not in the form of a catalogue so searches can be very slow even for a small number of images. However, PS provides the full set of photographic editing tools and processes including full Raw editing. This will cost a little more than the LR/Elements combination.
- Lightroom and Photoshop - This provides the advantages of cataloguing in LR as well as all the extra editing tools in PS. Probably most professionals would want this combination though it may be harder for an amateur to justify.
In making a choice, there are many other factors to consider such as budget and how keen are you to edit images. If you only want to make an occassional Red Eye correction then even Elements is over the top. However, some like me, have a technical background and enjoy having all the tools and processes at hand. You also need to spend some time learning how to use the more complex software and need to use it regularly to maintain your skills.
Topaz Plug-Ins
I now have the complete bundle of Topaz Plug-ins. I have used many Plug-ins over the years and most were free but the only "filter" I ever found useful was the Buzz Filter though this particualr filter was not free. Topaz Plug-ins are not free but they are not that expensive and work very well. Most of the free filters I have used in the past apply an effect globally without any consideration of global or local tonal values in the image. Topaz analayses the image so that effects can be applied according to the tonal values thus making the filter effects more relevant to more images and consistent. While I have used all of the current Topaz filters, the most useful to me are the Topaz ReMask 5, Topaz Adjust 5, Topaz B&W Efects, Topaz Simplify 3 and occassionally Topaz Detail 2. I have found little use for Topaz Clean, Topaz DeJPEG and Topaz DeNoise 5 as I use Portrait Professional to "Clean" portraits and have no need for DeJPG as I do not use this format. As I have a full frame camera, I rarely need to remove noise but Lightroom 3 is very effective if I do. I am amazed at the performance of ReMask 3 and can now cut out anything including models with fly away hair or even a veil. Some of the effects in Adjust 5 are very interesting and I use the B&W effects for most of my B&W conversions now. In Topaz simplify, the Buzz simulator is like the original Buzz filter but does not leave unsightly edge highlights as did the Buzz filter. Overall the Topaz Plug-in set is fun to use and does not cost too much.
Top
Colour Management
What is the Issue?
Our RGB colour images are represented as pixels with each having a red,green and blue value. Each physical device (e.g. monitor or printer ) will display different colours for the same RGB input. What chance is there that yours prints will be similar to what you see on your monitor or that the image on your monitor will be similar to the scene your camera captured? Can a particular colour be defined anyway?
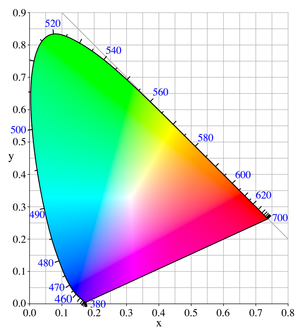
Colour Definitions
The international Commission on Illumination defined a colour space CIE 1931. From the colour space chromaticity diagram below, the boundary labelled in blue is the light wavelength (or colour). The diagram shows the maximum colour saturation but real devices such as monitors and printers cannot display such a wide range of colours. Nevertheless colours can be defined from this diagram and typical colour gamuts sit within the boundary.
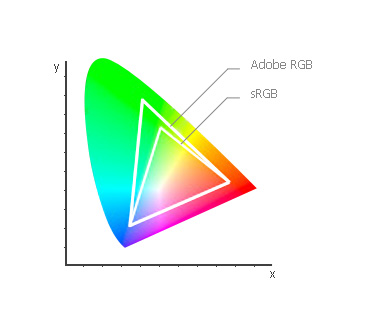
You may use a different colour gamut in different parts of your workflow but this may be fine if your image is correctly converted from one gamut to another. Two typical gamuts Adobe RGB and sRGB are shown below.
So providing your image colour space is known, the RGB values can be defined and thus can be displayed correctly. If the only issue was moving images across software, it would be all relatively straightforward but the photography workflow uses a number of physical devices so it is necessary to know the colour response of such devices when converting from one device to another.
Colour Conversions
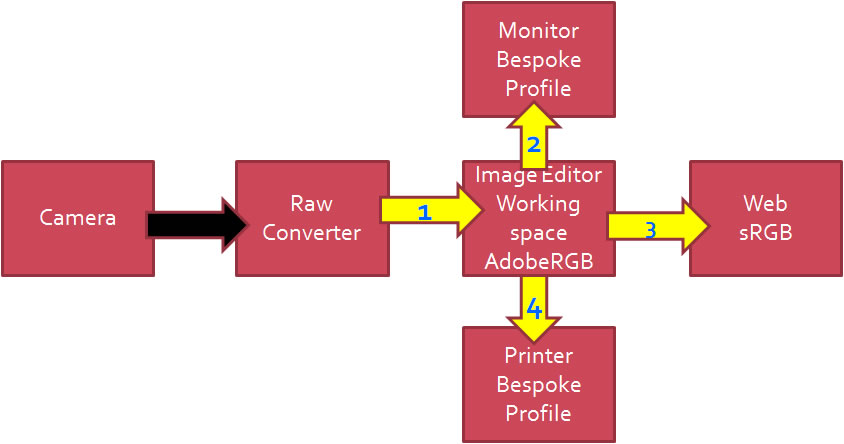
In the first conversion labelled 1, a Raw image is converted to an RGB file tagged with a defined colour space such as Adobe RGB. If you are using JPEG from your camera this conversion takes place within the camera. The color characteristics of the camera sensor will be known to the manufacturer so this information will be used in-camera to map the captured information to the standard colour space. Providing this information is accurate and does not vary across the same model then this would be fine. If you capture only Raw files, then these are converted in the Raw converter using a stored profile. Adobe stores many profiles often several for each camera model and you can create bespoke profiles if you wish. By default Adobe Raw recognises the camera from the EXIF data and selects an appropriate profile.
In the example above, the Image editor is working in Adobe RGB colour space so, if the converted Raw is already Adobe RGB a further conversion is not required. On the other hand if the incoming image was tagged with say ProPhoto RGB a conversion would take place in the editor. To display the image on a monitor it would be simple if the monitor matched the Adobe RGB colour space but not only does each model of monitor differ but usually each individual monitor and even then it can change with time. In some respects this is probably the most critical interface and although the manufacturers profile would be a good starting point, a bespoke profile may be necessary to achive a consistent and accurate rendition of colours. Similarly the conversion for a printer must be selected carefully to match the ink/paper combination and sometimes a bespoke profile is also needed here. Finally output to web normally requires a standard sRGB gamut so in our example, if the image editor working space is Adobe RGB, there is a need to convert to sRGB for web output.
How important is this for me?
If you are a professional photographer engaged in fashion or product photography, you need to fully understand colour calibration right across your workflow and use bespoke profiles at each conversion to achieve the required accuracy. Many other professionals will also need reasonably good colour accuracy (e.g. wedding photographers). At the other end of the scale, amateurs who just take occassional holiday snaps can probably ignore this topic completely. For myself as a keen amateur who enters many competitions, I cannot afford to have obvious colour casts in my final images though absolute colour accuracy will often not be critical. For example, if I photograph a model in a studio, poor skin colour may look wrong but an inaccurate dress colour will be of little consequence to the judge who has never seen the dress. Like many keen amateurs, it may not be absolutely necessary for me to use bespoke profiles at every stage but I do for most of my workflow. It may be a little over the top but, once having calibrated, I can confidently edit my images and print right first time both on my own printer or using a professional commercial printing service.
My Colour Management Process
I have listed this is priority order:-
- Monitor Profile - I use a Spyder 3 Pro to regularly calibrate my two monitors
- Printer Profile - I have downloaded the profiles for each ink/paper combination I use
- Editing Space - I choose to use Adobe RGB for my editing.
- Camera Profile - I have produce a bespoke dual illuminent profile for my camera
Monitor Profile
Profiling your monitor is probably the most important issue if you wish to have a reasonable chance of images on your monitor and your printer looking at least similar. Modern LCD monitors are nowhere near as bad as the old CRT monitors which had huge colour variations and, even after caluibration, could drift significantly within a few weeks. I find it unnecessary to calibrate my two LCD monitors more often than 3 monthly intervals. Before the calibrated profile is loaded on boot up, both of my monitors display the same image and differences are clearly visible. As soon as the profiles are loaded they look the same even though they are different models. When calibrating your monitor, it is vital to ensure that the brightness is set correctly as well. Some calibrators do help with this setting but, if not there are charts which can be downloaded for free. My monitors are both around 50% brightness but were 80% as delivered. High brightness level is the main reason why many photographers find printed images darker than their monitor. However, do remember that a monitor is emitted light and a print reflected light so a print will always appear "duller".
Printer Profiles
You need a specific profile to match the printer, paper and ink you are using. If you are using the manufacturers ink then life is much easier. It is likely that a number of profile will be installed when you install the printer driver but these will only apply to paper supplied by that manufacturer. To be fair Epson produce a good Premium Gloss and heavy Matte. However, you may wish to use paper by other suppliers. Generally the good quality paper suppliers provide profiles to match various printers. For the top independent paper brands they will even provide a bespoke profile if you request it. Although I did use a bespoke profile at one time, I find that the profiles provided give good results. If you use third party inks then you are definitely forced to use bespoke profiles.
Editor Colour Space
There are frequent discussions about this. If you never print and never likely to then you may as well use the web standard of sRGB. If you do print then you might wish to consider using Adobe RGB which is a slightly larger gamut. There are a number of factors to consider. If your printer has a larger gamut, you will be able to print a few more colours. If you use Adobe RGB it may be advisable to edit in 16 bits. Also when producing images for web, you will have to produce an sRGB version. For me, I edit in 16 bits anyway and my printer gamut does match Adobe RGB as does the professional printing service I sometimes use. When I produce versions of my images for web or projection, I produce them as needed using the Lightroom export function where I can resize, set quality, change to sRGB and save as JPEG with a single command. So there is little effort for me to use Adobe RGB with the prospect of a slightly larger gamut. From tests I have done, there is a clear improvement in using Adobe RGB with test charts but the difference is hardly apparent with real images.
Camera Calibration
If you use JPEG on your camera the colour conversion will be in the camera. While you cannot use a bespoke profile, you may be offered a choice and these are called "Styles" in Canon cameras. Canon recommend "Standard" for general photography but typically offer other styles as well such as Portrait, Landscape, Faithful, neutral & Monochrome and you may also be able to customise these. If you use Raw then the conversion will be in the Raw converter such as Adobe Raw. If you look in the Camera Calibration Tab (usually the last) which will be found in Lightroom, Photoshop and Elements, you will see that a selection of conversion profiles may be available. Typically Adobe Raw recognises the camera and offers a similar range as the camera "styles". Even if you do not wish to become involved with camera calibration, it is worth checking this tab to see what profile has been selected. It appears that typically by default a "Standard" profile is selected which would be a good choice for most photographers but there is no certainty so it is worth checking. Normally I have found that this setting does not change unless you positively do something such as associate a specific camera with a profile. For most photographers just selecting sensible profile (Style) will be enough though you can fiddle with the sliders if you wish (Photoshop and Lightroom only) though I would not personally recommend this.
It you really want accuracy then producing a bespoke profile or set of profiles is the answer and I would certainly expect product and fashion photographers to need to do so. Before outlining how to do this look at the images below to see the differenc it makes:

EOS 5D2 Before D300 Before
EOS 5D2 After D300 After
You can see that the 5D was too red and saturated before calibration and the D300 was better but perhaps a little too yellow and less saturated. Both cameras were independently calibrated and the Raw images re-converted using the respective bespoke profiles. The two After images are now very similar in colour.
Camera Calibration Process
If you are serious about this then you need to buy a calibration chart. I use and recommend the X-Rite Color Checker Passport. I also recommend that you download the DNG Profile Editor from Adobe Labs which is free though the Color Checker Passport does come with similar software. You can take a series of images of the colour Checker Passport Color Chart in different lighting conditions and create a profile for each. For future photography, you can then choose the most appropriate profile to suit the taking conditions. An alternative is the create a single Duel-Illuminant profile for the camera. For this you typically take an shot of the Colour checker in tunsten lighting (say 2850 K) and then in sunlight (say 6500 K). The DNG Profile Editor will combine this data to create a Dual Illuminant profile so that the values in between 2850 K and 6500 K are calculated by interpolation based on the White Balance. The details for producing the the profiles and installing can be found in the documentation with the Colour Checker Passport and the Adobe DNG Profiler. For myself, I use Lightroom and have associated my Camera with this Dual Illuminant profile so, when I import Raw files, the correct bespoke profile is applied automatically.
Understanding Histograms for Raw Files
Histograms in Digital Photography
We are told that white values are recorded on the right and black on the left with other tones in between. We are also told that any tones beyond the right hand end will be clipped and thus displayed as pure white. Similarly any dark tones beyond the left hand end will be displayed as black. It might also seem reasonable to assume that a tone 1 stop less than the white clipping point will be in the middle of the histogram 50% value. This turns out not to be true because the histograms used in cameras and editing software are not based on linear data values as captured by the camera; they are gamma corrected values.
Gamma Correction
Gamma correction was introduced for all image files as gamma correction was needed for CRT monitors and printers. Raw files are not gamma corrected but retain the original captured linear data (Raw files cannot be directly displayed or printed). It became established that all images (other than Raw files) would be gamma corrected with a value of 2.2. Interestingly modern LCD monitors do not require this so have to degamma to revert the image data to linear. This is not really a problem as it only requires a simple chip and industry is set up to use gamma corrected files now.
Raw Histogram
What does this mean for Raw files when we view a histogram. If again we assume that the far right of the histogram represents white and the clipping point then a tone 1 stop below this will actually be display at the 73% position not 50%. 2 stops down will be at 54%, (even though it is 25% light value), 8 stops will be at 8% and 10 stops at 4%. The reason for this is that you are not seeing the Raw data displayed but a Gamma corrected version of it. In fact it is the same type of display you would have if viewing a JPEG file where the data has been gamma corrected. With the JPEG files, tones that are beyond the white clipping point cannot be recovered; it is possible to make a small recovery when not all of the RGB channels are clipped so a clipped channel may be estimated from an unclipped. In practice this may only buy a very small recovery in some cases. For a Raw file the situation is quite different. The histogram shown in Adobe Raw or Lightroom is displaying a gamma corrected set of data. In fact the display of the image you see and the histogram is based on what the rendered Raw file will produce with the current editing and settings. This makes sense in that you really want to see what you will end up with rather than the starting point. An exposure adjustment can pull in tones which were previously apparently outside the clipping point provided that they were not previousy clipped by the sensor. It is feasible to pull in highlight and shadow detail to cope with images of a much higher dynamic range than is possible for JPEG images. It is important to realise that the exposure adjustment (and other raw editing adjustments) are not crude transformations of the data but the new values are re-calculated using the Bayer algorithm.
Capture and Histograms
To get the best exposure, it is helpful to know the dynamic range of the scene that we are trying to capture. Assuming that the scene is 7 stops dynamic range, it would be wise to just avoid clipping (apart from any specular highlights possibly) when using JPEG files. This would mean that a few of the darkest shadow details may be lost. The camera histogram can help in determining exposure for JPEG capture. If the capture is in Raw then the sensor dynamic range is probably at least 11 stops so you have about 4 stops spare and could thus make as much as +/- 2 stops error in exposure and still correct in the Raw editor. While I would not advocate sloppy exposure settings, it is useful to know that you do not have to be spot on. The histogram on your camera will show you values based on the JPEG image which is embedded in your Raw file but not the actual Raw data so is this of any use? I would suggest that it is still a rough guide but just because the histogram shows some clipping, it no longer follows that the Raw data is clipped. If you were capturing a scene of 11 stops dynamic range then this suggests that you do need to achieve accurate exposure settings on the camera and the histogram is only a very rough guide. I personally use exposure settings based on previous long experience (including film) but if I estimate the scene is close to the sensor dynamic range (about 11 stops), I use bracketing (and HDR processing in more extreme cases).
Top